

|
|
Site map :
Last upgrade to the site:
There has been
This is an unofficial LEGO® web site. Copyright 1996, 2000, Denis Cousineau
|
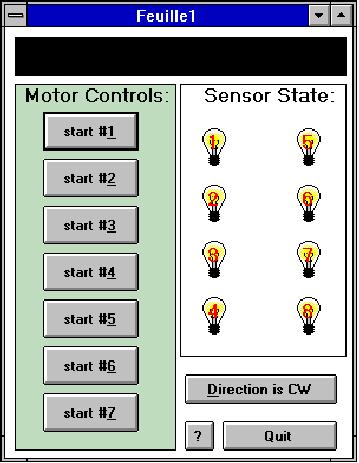
This page present programs working in Windows 3.11The main program is a DLL (dynamic library link) that contains functions that can be called using any programming language, as Visual Basic, Visual C, or Turbo Pascal. It contains routines that controls the parallel port. It can be initialized for a specific LPT port, if you have more than one (we recommend that you buy a cheap parallel port card –or even a cheap computer– while making tests, just in case...). It can control as many as 7 motors, and can detect as many as 8 sensors through on/off switch connected to the port. You can also change the direction of the motors, but they will all turn in the same direction. Those programs are fully functional, but the parallel port, since it outputs 5 volts, 20 mA, cannot be used directly to control a Lego motor. You need a controller that amplifies the signal to 9 volts, ~600 mA in order to run Lego motors. Of the 25-pins parallel cable: You can download:
LEGO.dll: the library It must be placed in the C:\WINDOWS directory in order to work. LEGO.pas: the source code contains the description of the library, written in Turbo-Pascal for Windows
UNITLEGO.pas: needed for using the DLL in a Turbo-Pascal program TEST.pas: a short test program TEST.exe: the compiled program In case you do not have a turbo-Pascal compiler, with the dll and this executable, you can make tests. Download this file in, say, the directory C:\TEMP. Then, in the Program Manager, choose File: Run, and type in C:\TEMP\TEST-PAS, ok. (You need the DLL)
LEGO-VB.MAK The project file for visual-basic v3.0 LEGO-VB.FRM Description of the main window LEGO-VB.EXE An executable version of the program, in case you do not have the visual-basic software. Download this file in, say, the directory C:\TEMP. Then, in the Program Manager, choose File: Run, and type in C:\TEMP\lego-vb, ok. (you need the DLL) Of course, I may not be held responsible for any damage that could be caused by these programs For a test: Test of the motor: You can use any voltmeter, and measure the current on pins 2 through 9 by placing the + tip on the pin, and the – pin on the metallic plug of the parallel cable. Test of the sensor: Use a 1 K Ohms resistor, put one tip on the metallic plug of the cable and the other tip on one of the sensor pin (1, 14, 16, 15, 13, 12, 11, 10). The resistor is to avoid power surge to the computer that could damage it. |
|
